keycloak-webauthn-authenticator 動作確認めも
はじめに
KeycloakでWeb Authenticationを試す際の設定メモです。 まだ開発中のようなので動作確認手順が変わることが考えられます。最新の手順は以下のリポジトリのREADMEを参照してください。 github.com
環境構築
今回検証した環境は以下のとおりです。Web AuthenticationはOSやブラウザによって挙動が異なるので注意してください。
macOS Mojave 10.14/3
Chrome 73.0.3683.103
また、Web Authentication API利用時は基本的にhttpsである必要があります。ただ、localhostのみ例外でhttpsではなくても利用可能です。もし、localhost以外で動作確認する際はKeycloakをhttps対応してください。
Please note: both create() and get() require a Secure Context (e.g. - the server is connected by https or is the localhost), and will not be available for use if the browser is not operating in a secure context.
https://developer.mozilla.org/en-US/docs/Web/API/Web_Authentication_API
keycloak-webauthn-authenticatorのビルド
以下の手順でkeycloak-webauthn-authenticatorのクローン、ビルドをおこないます。
$ git clone https://github.com/webauthn4j/keycloak-webauthn-authenticator.git
$ cd keycloak-webauthn-authenticator
$ mvn install
Keycloakのデプロイ
今回はKeycloakのdocker imageを利用して環境を構築してみます。
$ docker run -p 8080:8080 -d -e KEYCLOAK_USER=admin -e KEYCLOAK_PASSWORD=password jboss/keycloak
KeycloakのデプロイができたらCONTAINER IDを確認しておきます。
$ docker ps -a
CONTAINER IDを確認できたらコンテナに先ほどビルドしたkeycloak-webauthn-authenticatorのEARをコピーします。
$ docker cp webauthn4j-ear/target/keycloak-webauthn4j-ear-*.ear 【CONTAINER ID】:/opt/jboss/keycloak/standalone/deployments
ここまでできたら、KeycloakのUIからAuthentication Flowの設定を行なっていきます。
今後の手順でWebAuthn関連の設定項目が表示されていなかった場合、こちらの手順に戻りEARが配置されているかどうか確認してみてください。
Authentication Flowの設定
まず、コンソール画面にアクセスします。上記の手順でデプロイしていた場合、http://localhost:8080/authからusernameにadmin、passwordにpasswordをそれぞれ入力することでログインできます。

Registration Flowの設定
まず、[Realm Settings] -> [Login]からUser registrationを有効にします。

次に[Authentication] -> [Flows] -> [Registration]から[Copy]を押下します。
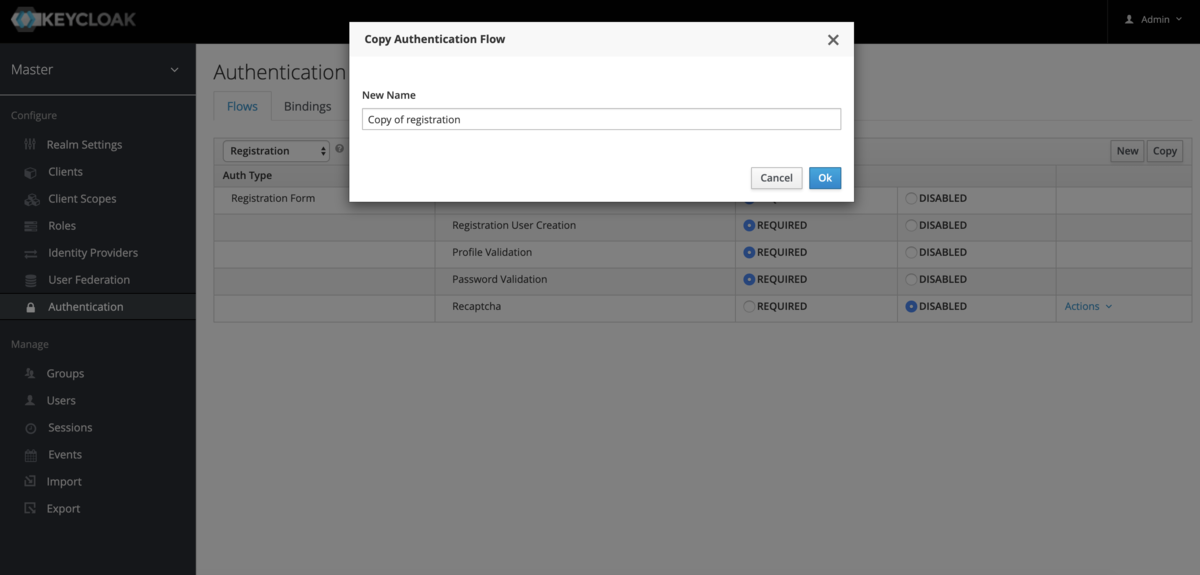
Copyが正常にできると以下のような表示になるので、[Add execution]を押下します。
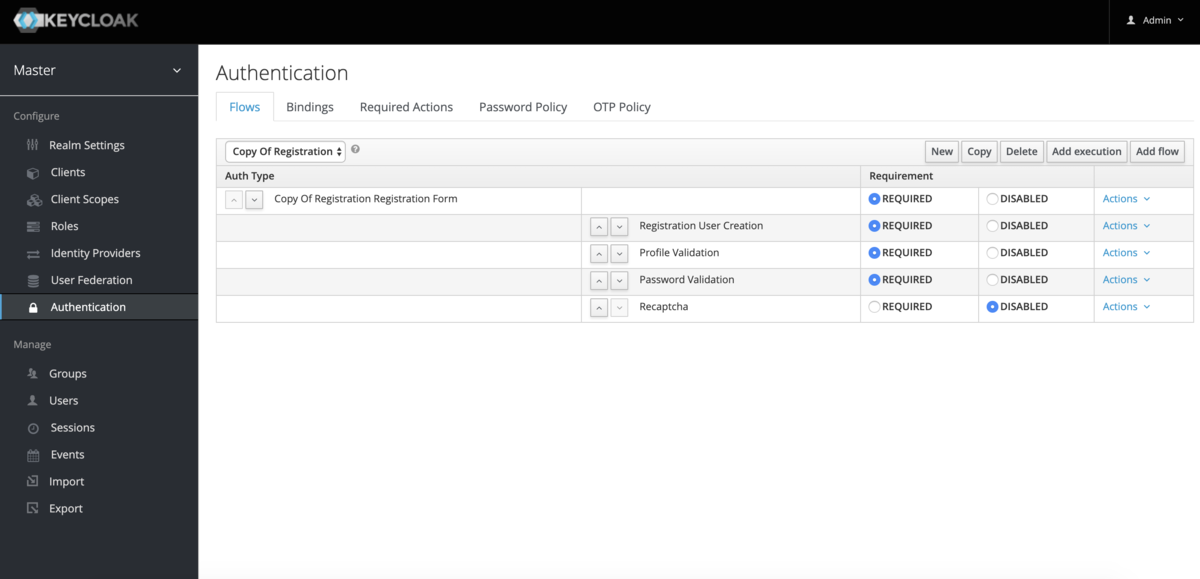
[Provider]プルダウンからWebauthn Registerを選択し[Save]を押下します。
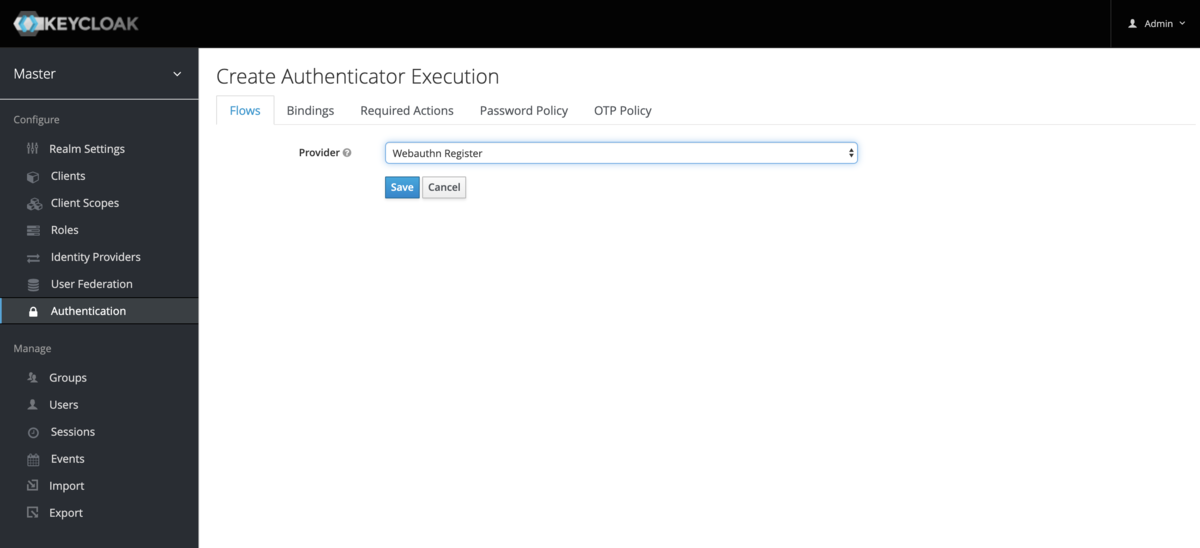
WebauthnRegisterが追加されているのが確認できるのでREQUIREDにしておきます。
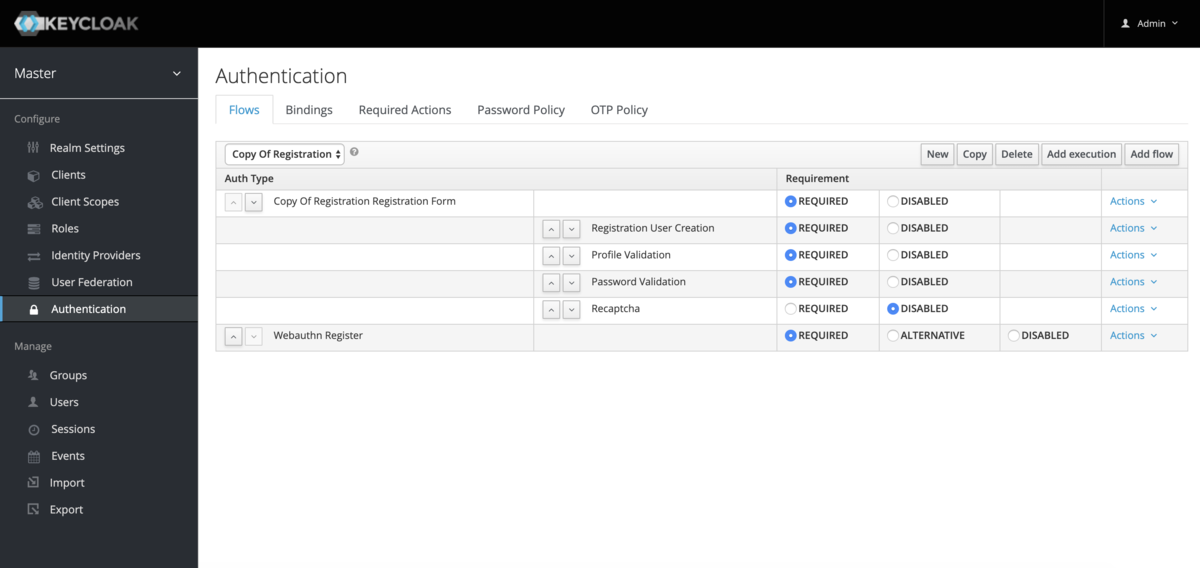
[Bindings] -> [Registration Flow]から先ほど作成した[Copy of registration]を選択し、[Save]を押下します。

ここまでできたら、Sign Outして一度動作確認をしてみます。
 [Reigster]を押下するとChromeを利用している場合、以下のようなダイアログがでます。
 今回はYubicoのSecurity Keyを認証器として利用します。
[USBセキュリティキー]を選択すると以下のようなダイアログが表示されるので、YubicoのSecurity Keyを利用している場合であれば認証器にタッチします。
 すると、以下のような画面が表示されました。Forbiddenとなっているので何かしらの権限が足りないようです。

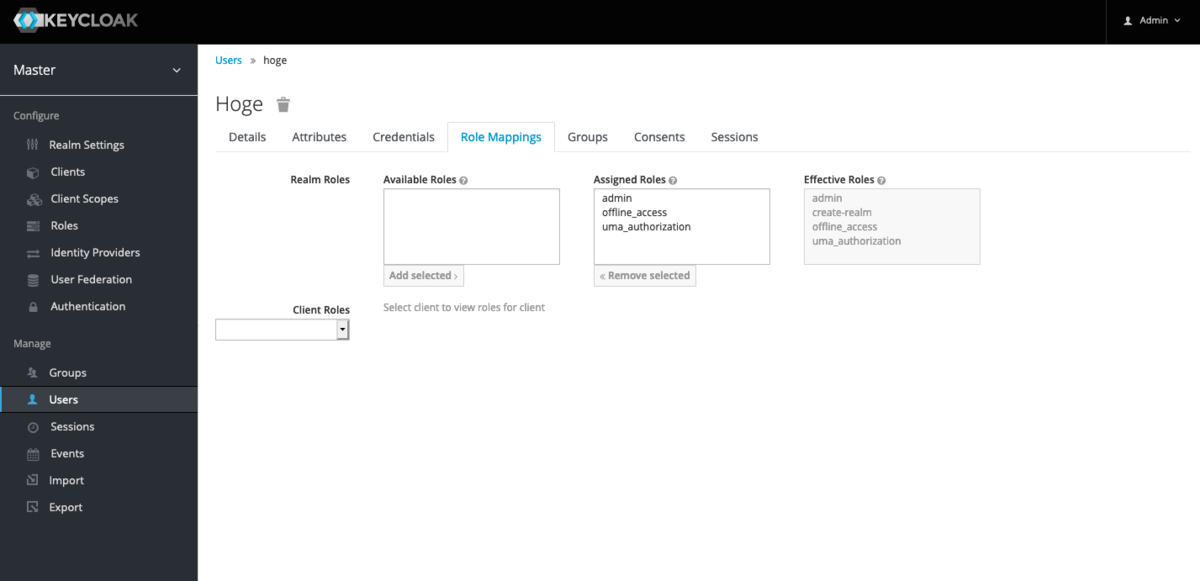
再度、adminでログインし直し、Manageの[Users]を押下します。先ほど登録したユーザーが存在していることが確認できます。

とりあえず、Role Mappingsから全てのRoleを紐づけておきます。
Browser Flow (2 Factor Authentication)
[Authentication] -> [Flows] -> [Browser]から[Copy]を押下します。
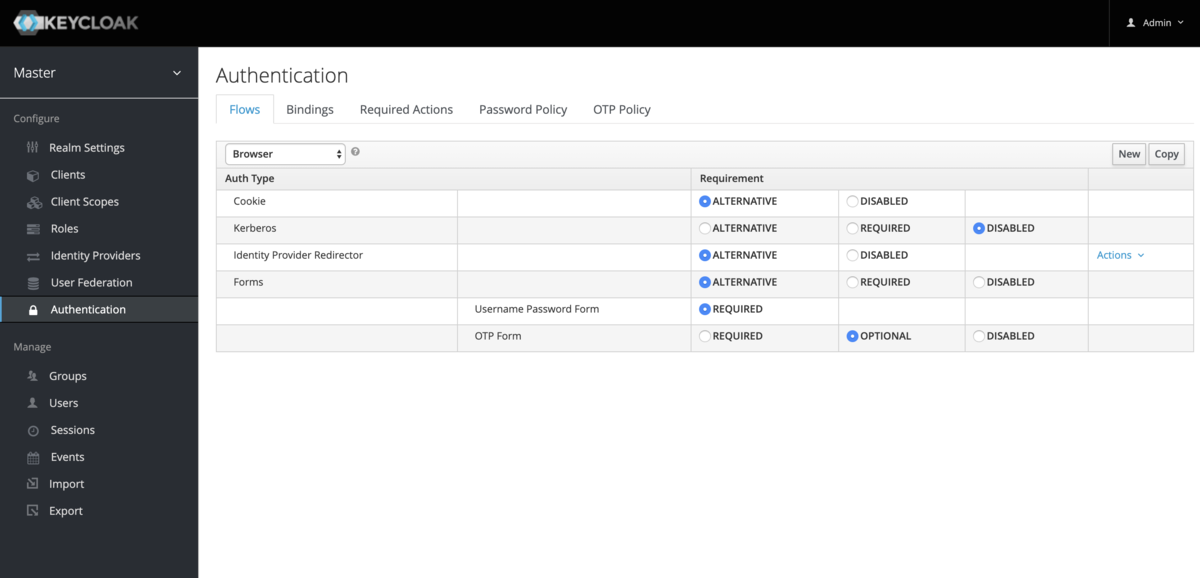
Copyが正常にできると以下のような表示になるので、[Add execution]を押下します。

[Provider]プルダウンからWebAuthn Authenticatorを選択し、[Save]を押下します。

追加されたWebAuthn AuthenticatorをREQUIREDにします。
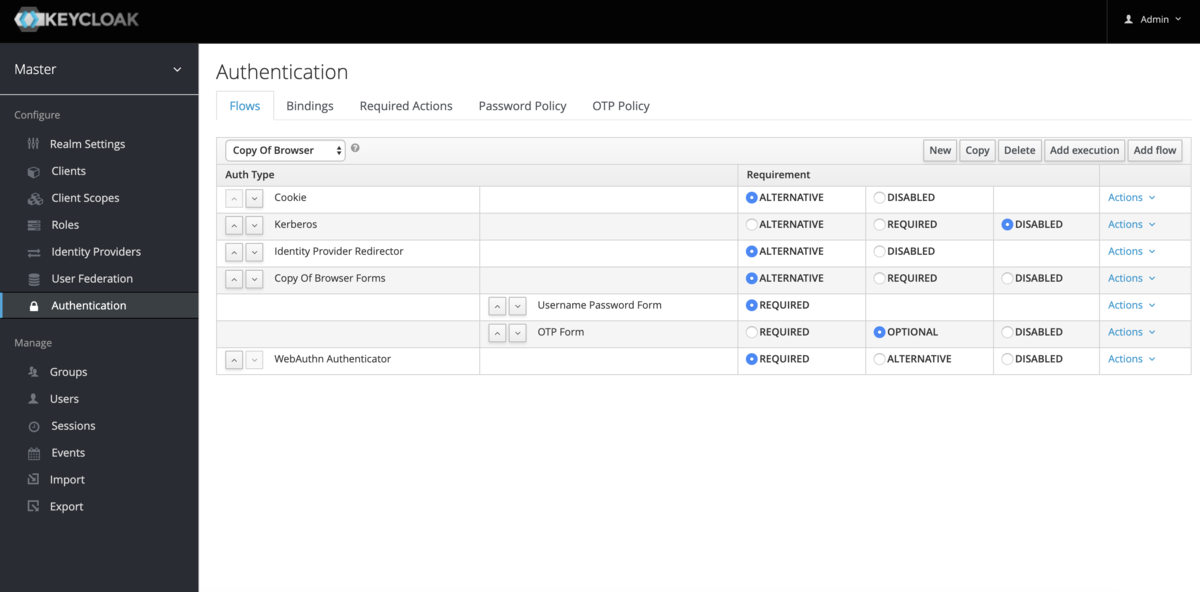
[Bindings] -> [Browser Flow]から先ほど作成した[Copy of browser]を選択し、[Save]を押下します。ここまでで設定は終了です。Sign Outして動作確認をしてみましょう。

Loginページからユーザー名とパスワードを入力します。

すると、以下のような画面が表示されるので、[Authenticate]ボタンを押下します。

Chromeであれば以下のようなダイアログが表示されるので、セキュリティキーを利用してユーザー登録をしていた場合は認証器にタッチなどをします。

正常に設定ができていればコンソール画面が表示されるはずです。
おわりに
今回はKeycloakでWebAuthenticationを使ったBrowser Flow (2 Factor Authentication)を試してみました。
GIFによる動作確認は以下のTweetからも確認できますので合わせてお願いします。
冒頭でも述べましたが、こちらはまだ開発段階のため動作確認手順は今後変わることが考えられます。KeycloakのBrowser Flow (2 Factor Authentication)できた!! pic.twitter.com/euhS9Yj3US
— 56 (@kg0r0) April 13, 2019
適宜最新のREADMEや公式のドキュメントを参照してください。
Issue 946993: Touch ID authenticator returns attestedCredentialData in GetAssertion response
はじめに
先日chromiumバグ報告デビューしました。
該当箇所としては、Chromeでnavigator.credentials.get()を呼び出した後にMacBookのTouch IDを認証器として利用した際のAuthenticator Dataです。
こちらは、ChromeからMacBookのTouch IDを利用したWeb Auhtenticationを実装していた際に見つけたものになります。
qiita.com
StatusがFixedになり、クローズされたようなので今回報告した内容について記録しておきます。 bugs.chromium.org
Authenticator Dataについて
そもそもAuthenticator Dataについてですが、WebAuthentication APIのnavigator.credentials.create()およびnavigatro.credentials.get()を呼び出した際の結果に含まれるデータになります。
(https://www.w3.org/TR/webauthn/#sec-authenticator-data)
各パラメーターについては以下の通りです。
- rpIdHash : rpIdのハッシュ値
- flags : User VerificationやUser Presenceの結果
- signCount : カウンタ
- attestedCredentialData : 公開鍵に関する情報
また、Authenticator Dataの構造については以下のとおりです。
(引用元 : https://www.w3.org/TR/webauthn/)
報告内容
問題箇所は、Chromeでnavigator.credentials.get()を呼び出した後にMacBookのTouch IDを認証器として利用した際のAuthenticator Dataです。
Touch IDを利用したWeb Authenticationを試していた際に、YubiKeyを認証器とした場合と比べてAuthenticator Dataのサイズがかなり大きいことに気づきました。
認証時のAuthenticator Dataはこちらの画像のように、37byteなのではないかと考えていたので、counterが長すぎるのではないかと報告しました。(後にこの考えは間違いで、extensionsがセットされている場合は37byteより長くなるということを教えていただきました)
 (引用元 : https://slides.com/fidoalliance/jan-2018-fido-seminar-webauthn-tutorial#/)
報告をすると、すぐに以下のような回答をいただきました。
Thanks for the report. The counter looks correct, but I think it erroneously appends includes attestedCredentialData in the authenticatorData, when it should be omitted during a GetAssertion operation.
どうやら、認証時のAuthenticator DataにattestedCredentialDataが含まれて返されていたようです。 (そういえば以前、認証時のAuthenticator Dataを登録時のAuthenticator Dataのparserに入れたら何かでてきたのを思い出した)
ちなみにauthenticatorDataのパース結果 pic.twitter.com/IwTbe6om3t
— 56 (@kg0r0) 2018年12月2日
最終的に、認証時のAuthenticator Dataについて、extensionsがセットされている際に37byteより長くなることはあるが、attestedCredentialDataは必要ないという結論になり、修正されました。
It can be longer than 37 bytes if extensions are sent (in which case the extensions bit is set in the authenticatorData flags). You are correct though, that the authenticator should not send attestedCredentialData for a GetAssertion operation.
参考
https://www.w3.org/TR/webauthn/
https://slides.com/fidoalliance/jan-2018-fido-seminar-webauthn-tutorial#/
https://bugs.chromium.org/p/chromium/issues/detail?id=946993&can=2&start=0&num=100&q=&colspec=ID%20Pri%20M%20Stars%20ReleaseBlock%20Component%20Status%20Owner%20Summary%20OS%20Modified&groupby=&sort=
Pragyan CTF 2019 writeup
Easy RSA
以下の値が渡される。eが大きいのでWiener's Attackができるのではと考える。
n = 413514550275673527863957027545525175432824699510881864021105557583918890022061739148026915990124447164572528944722263717357237476264481036272236727160588284145055425035045871562541038353702292714978768468806464985590036061328334595717970895975121788928626837881214128786266719801269965024179019247618967408217
e = 217356749319385698521929657544628507680950813122965981036139317973675569442588326220293299168756490163223201593446006249622787212268918299733683908813777695992195006830244088685311059537057855442978678020950265617092637544349098729925492477391076560770615398034890984685084288600014953201593750327846808762513
c = 337907824405966440030495671003069758278111764297629248609638912154235544001123799434176915113308593275372838266739188034566867280295804636556069233774555055521212823481663542294565892061947925909547184805760988117713501561339405677394457210062631040728412334490054091265643226842490973415231820626551757008360
以下、solverです。
from fractions import Fraction

def egcd(a, b):
    x,y, u,v = 0,1, 1,0
    while a != 0:
        q, r = b//a, b%a
        m, n = x-u*q, y-v*q
        b,a, x,y, u,v = a,r, u,v, m,n
        gcd = b
    return gcd, x, y

def decrypt(p, q, e, ct):
    n = p * q
    phi = (p - 1) * (q - 1)
    gcd, a, b = egcd(e, phi)
    d = a
    pt = pow(ct, d, n)
    return hex(pt)[2:-1].decode("hex")

def continued_fractions(n,e):
    cf = [0]
    while e != 0:
        cf.append(int(n/e))
        N = n
        n = e
        e = N%e
    return cf

def calcKD(cf):
    kd = list()
    for i in range(1,len(cf)+1):
        tmp = Fraction(0)
        for j in cf[1:i][::-1]:
            tmp = 1/(tmp+j)
        kd.append((tmp.numerator,tmp.denominator))
    return kd

def int_sqrt(n):
    def f(prev):
        while True:
            m = (prev + n/prev)/2
            if m >= prev:
                return prev
            prev = m
    return f(n)

def calcPQ(a,b):
    if a*a < 4*b or a < 0:
        return None
    c = int_sqrt(a*a-4*b)
    p = (a + c) /2
    q = (a - c) /2
    if p + q == a and p * q == b:
        return (p,q)
    else:
        return None

def wiener(n,e):
    kd = calcKD(continued_fractions(n,e))
    for (k,d) in kd:
        if k == 0:
            continue
        if (e*d-1) % k != 0:
            continue
        phin = (e*d-1) / k
        if phin >= n:
            continue
        ans = calcPQ(n-phin+1,n)
        if ans is None:
            continue
        return (ans[0],ans[1])

n = 413514550275673527863957027545525175432824699510881864021105557583918890022061739148026915990124447164572528944722263717357237476264481036272236727160588284145055425035045871562541038353702292714978768468806464985590036061328334595717970895975121788928626837881214128786266719801269965024179019247618967408217
e = 217356749319385698521929657544628507680950813122965981036139317973675569442588326220293299168756490163223201593446006249622787212268918299733683908813777695992195006830244088685311059537057855442978678020950265617092637544349098729925492477391076560770615398034890984685084288600014953201593750327846808762513
c = 337907824405966440030495671003069758278111764297629248609638912154235544001123799434176915113308593275372838266739188034566867280295804636556069233774555055521212823481663542294565892061947925909547184805760988117713501561339405677394457210062631040728412334490054091265643226842490973415231820626551757008360

(p,q) = wiener(n,e)

print "p=", str(p)
print "q=", str(q)


plaintext = decrypt(p, q, e, c)
print "pass:", plaintext
実行結果はこちらの通り。
p= 20849180417451853710316597265206450290754170726980118770375941268686670371486003295019076447328939684328124148947495424092191017095312378807096231649456257
q= 19833611777350261527711079937022117212864220836350357905133650650024955479645832765842667370773048457804959743454987087255447637313845649824446832388600281
pass: Here is your flag, pctf{Sup3r_st4nd4rd_W31n3r_4tt4ck}
参考
【 FIDO Conformance Toolsメモ 】Server-ServerPublicKeyCredentialCreationOptions-Req-1 Test server generating ServerPublicKeyCredentialCreationOptionsRequest
- はじめに
- Server-ServerPublicKeyCredentialCreationOptions-Req-1 Test server generating ServerPublicKeyCredentialCreationOptionsRequest
- P-1 Get ServerPublicKeyCredentialCreationOptionsResponse, and check that:
- P-2 Request from server ServerPublicKeyCredentialCreationOptionsResponse with "none" attestation, and check that server, and check that ServerPublicKeyCredentialCreationOptionsResponse.attestation is set to "none"
- P-3 Get two ServerPublicKeyCredentialCreationOptionsResponses, and check that challenge in Request1 is different to challenge in Request2
- 参考
はじめに
FIDO Conformance ToolsのServer-ServerPublicKeyCredentialCreationOptions-Req-1 Test server generating ServerPublicKeyCredentialCreationOptionsRequest という項目について書いていきます。
前回はv0.10.110(BETA)(BETA FIDO2)というバージョンを利用していましたが現在はv0.10.207を利用しています。
テスト項目についても以前の記事に追記しているのでよろければ確認ください。
Server-ServerPublicKeyCredentialCreationOptions-Req-1 Test server generating ServerPublicKeyCredentialCreationOptionsRequest
こちらのテスト項目については目次の通りになります。
P-1 Get ServerPublicKeyCredentialCreationOptionsResponse, and check that:
(a) response MUST contain "status" field, and it MUST be of type DOMString and set to "ok"
こちらはレスポンスにstatusフィールドがあるかどうかのチェックのようです。
成功時、失敗時それぞれ以下のようなレスポンスを返すようにします。
- 成功時の例
{
    "status": "ok",
    "errorMessage": ""
}
- 失敗時の例
    {
        "status": "failed",
        "errorMessage": "User does not exists!"
    }
(b) response MUST contain "errorMessage" field, and it MUST be of type DOMString and set to an empty string
こちらも(a)と同様にerrorMessageを全てのレスポンスで返すようにします。
- 成功時の例
{
    "status": "ok",
    "errorMessage": ""
}
- 失敗時の例
    {
        "status": "failed",
        "errorMessage": "User does not exists!"
    }
(c) response contains "user" field, of type Object and:
(1) check that user.name is not missing, and is of type DOMString
user.nameの有無をチェックしているかのテストのようです。
以下のように/attestation/optionsで返すオプションにuser.nameを含めて返します。
...
        user: {
            id: id,
            name: username,
            displayName: displayName
},
...
(2) check that user.displayName is not missing, and is of type DOMString
displayNameの有無をチェックしているかのテストのようです。
以下のように/attestation/optionsで返すオプションにuser.displayNameを含めて返します。
...
        user: {
            id: id,
            name: username,
            displayName: displayName
},
...
(3) check that user.id is not missing, and is of type DOMString, and is not empty. It MUST be base64url encoded byte sequence, and is not longer than 64 bytes.
user.idについてのテストのようです。
ここでは、そのidが存在しているか、typeがDOMStringか、base64url encodeされているか、64byteより長くないかどうかチェックされていそうです。
以下のように乱数を生成して、base64urlエンコードしたのちにレスポンスに含めるようにします。
    let buff = crypto.randomBytes(32);

    return base64url(buff);
(4)If user.icon is presented, check that it's is of type DOMString
もしiconが渡された時に型をチェックしているかどうかのテストのようです。
自分は全然チェックしたつもりないけど通っていました。そもそもオプションでiconを返していなければ問題なさそうでしょうか??
(d) response contains "rp" field, of type Object and:
(1) check that rp.name is not missing, and is of type DOMString
rp.nameに関するテストのようです。
/attestation/optionsのレスポンスでrpにnameを含めてレスポンスを返しておけば問題なさそうです。
    {
        "status": "ok",
        "errorMessage": "",
        "rp": {
            "name": "Example Corporation"
        },
    ...
    }
(2) check that rp.id is not missing, and is of type DOMString.
rp.idに関するテストのようです。
特に/attestation/optionsではrp.idを返すようにしていなかったはずだが通っていました。おそらく/attestation/resultの以下の処理でしょうか??
    if(!request.body       || !request.body.id
    || !request.body.rawId || !request.body.response
    || !request.body.type  || request.body.type !== 'public-key' ) {
        response.json({
            'status': 'failed',
            'errorMessage': 'Response missing one or more of id/rawId/response/type fields, or type is not public-key!'
        })
        return
    }
(3) If rp.icon is presented, check that it's is of type DOMString.
rp.iconに関するテストのようです。
チェックした記憶がないが通っていました。そもそもrp.iconをオプションとして返していなければ問題なさそうでしょうか??
(e) response contains "challenge" field, of type String, base64url encoded and not less than 16 bytes.
challengeに関するテストのようです。
以下のように乱数を生成してbase64urlエンコード後レスポンスに含めて返します。
    let buff = crypto.randomBytes(32);

    return base64url(buff)
(f) response contains "pubKeyCredParams" field, of type Array and: /attestation/optionsのレスポンスのpubKeyCredParamsのチェックのようです。 pubKeyCredParamsのtypeがArrayになっていれば問題なさそうです。
    {
        "status": "ok",
        "errorMessage": "",
        ...
        "pubKeyCredParams": [
            {
                "type": "public-key",
                "alg": -7
            }
        ],
     ...
    }
(1) each member MUST be of type Object
pubKeyCredParamsの中身がObjectかどうかのチェックのようです。
以下のように/attestation/optionsでレスポンス生成時にpubKeyCredParamsのArrayの中身がObjectになっていれば問題なさそうです。
 ...
        pubKeyCredParams: [
            {
                type: "public-key",
                alg: -7
            }
        ]
 ...
(2) each member MUST contain "type" field of type DOMString
pubKeyCredParamsに含まれるObjectがtypeという値を含むかどうかのチェックのようです。
以下のようにtyepを含めてレスポンスを返します。
 ...
        pubKeyCredParams: [
            {
                type: "public-key",
                ...
            }
        ]
 ...
(3) each member MUST contain "alg" field of type Number
pubKeyCredParamsに含まれるObjectがalgという値を含むかどうかのチェックのようです。
以下のように型に注意してalgを含めてレスポンスを返します。
 ...
        pubKeyCredParams: [
            {
                ...
                alg: -7
            }
        ]
 ...
(4) MUST contain one member with type set to "public-key" and alg set to an algorithm that is supported by the authenticator
pubKeyCredParamsに含まれるObjectのtypeがpublic-keyであるかどうか、algがサポートされているアルゴリズムかどうかのテストのようです。
以下のようなレスポンスを返すようにします。
 ...
        pubKeyCredParams: [
            {
                type: "public-key",
                alg: -7
            }
        ]
 ...
(g) If response contains "timeout" field, check that it's of type Number and is bigger than 0
もしレスポンスにtimeoutを含む場合のパラメーターに関するてチェックのようです。
そもそもオプションでtimeoutを返さなければ問題なさそうです。
(h) response contains "extensions" field, with "example.extension" key presented
extensionsに関するテストのようです。
このテストに関しては正直あまりよくわかっていないです。
該当するテストの/attestation/optionsに対するリクエストにextensionsのフィールドがありました。
結局 /attestation/optionsにリクエストにextensionsがあったらそのままオプションに含めて返す処理を追加しました。
   ...
    challengeMakeCred.extensions = request.body.extensions;
   ...
    response.json(challengeMakeCred)
})
P-2 Request from server ServerPublicKeyCredentialCreationOptionsResponse with "none" attestation, and check that server, and check that ServerPublicKeyCredentialCreationOptionsResponse.attestation is set to "none"
該当するテストの/attestation/optionsに対するリクエストにattestationのフィールドがあり、そこに"none"が指定されていました。 リクエストでattestationが指定された場合はそれを優先的にレスポンスに含めてオプションを返すようにします。
   }
   ...

        attestation: request.body.attestation || 'direct',

    ...
    }
P-3 Get two ServerPublicKeyCredentialCreationOptionsResponses, and check that challenge in Request1 is different to challenge in Request2
ServerPublicKeyCredentialCreationOptionsResponsesのchallengeに関するテストのようです。
リクエストごとに毎回異なるchallengeを利用していれば問題なさそうです。
   if(clientData.challenge !== request.session.challenge) {
        response.json({
            'status': 'failed',
            'errorMessage': 'Challenges don\'t match!'
        })
    }
参考
https://fidoalliance.org/specs/fido-v2.0-rd-20180702/fido-server-v2.0-rd-20180702.html
STEM CTF: Cyber Challenge 2019 writeup
はじめに
以前延期になったCTFが開催されていたのでやってみた。
In Plain Text Binary RE - 50 points
以下問題文。
Starring: Mary McCormack, Fred Weller, Nichole Hiltz, Todd Williams, Lesley Ann Warren, Paul Ben-Victor, Cristián de la Fuente, Rachel Boston
stringsコマンド実行したらFLAGがあった。
$ strings challenge
MCA{y3ah_sur3_here_y0u_g0}
Turing Test Web - 50 points
以下、問題のページ。秘密の質問をパスすれば良いっぽい。

Alan Turingについてググって内容を埋めるだけで良いらしい。難しく考えすぎていて悲しい...

TODO Web - 100 points
アクセスしてみると以下のようなページがあった。

URLhttp://138.247.13.110/todolist/1000/の1000の箇所を書き換えると過去のTODOが見れるようだ。
あとは、1000のTODOの中からFLAGが書かれているページを探して終了。以下、solverです。
import requests
import re

baseurl = 'http://138.247.13.110/todolist/'
for i in range(1000):
    payload = {'page': str(i)}
    url = baseurl + str(i) + '/'
    r = requests.get(url)
    print('[*]Requests: ' + url)
    if re.search(r'MCA', r.text):
        print(r.text)
        break;
http://138.247.13.110/todolist/678/にFLAGがあったようです。FLAGはMCA{al3x4_5et_a_r3minder}。

Warm UP Crypto - 50 points
競技時間以内に解けなかった。以下のwriteupを見たらちょっとした気づきがあったのでメモを残す。 github.com
以下問題文。
Description
Everyone says that PGP is hard to use. Show ‘em how it’s done.
渡されたファイルは以下の4つ。
flag.html.enc
key.enc
mitre-ctf-2019-private.asc
passphrase.txt
とりあえずパスフレーズを確認する。
$ cat passphrase.txt
just use ctfd
適当に秘密鍵をインポートしてみる。
$ gpg --allow-secret-key-import --import mitre-ctf-2019-private.asc
gpg: key CB374E23: secret key imported
gpg: /home/vagrant/.gnupg/trustdb.gpg: trustdb created
gpg: key CB374E23: public key "CTF Competitor (This is private key for a 2019 MITRE CTF Competitor and should not be trusted!) <fake@fake>" imported
gpg: Total number processed: 1
gpg:               imported: 1  (RSA: 1)
gpg:       secret keys read: 1
gpg:   secret keys imported: 1
秘密鍵のインポートができたら、key.encを復号する。パスフレーズは先ほど確認したものを入力すれば良い。
$ gpg key.enc

You need a passphrase to unlock the secret key for
user: "CTF Competitor (This is private key for a 2019 MITRE CTF Competitor and should not be trusted!) <fake@fake>"
2048-bit RSA key, ID 87BA2B5E, created 2018-12-03 (main key ID CB374E23)

gpg: gpg-agent is not available in this session
gpg: encrypted with 2048-bit RSA key, ID 87BA2B5E, created 2018-12-03
      "CTF Competitor (This is private key for a 2019 MITRE CTF Competitor and should not be trusted!) <fake@fake>"
gpg: key.enc: unknown suffix
Enter new filename [key]: decrypted_key
gpg: Signature made Mon Dec  3 22:48:09 2018 UTC using RSA key ID F2FFFCB4
gpg: Can't check signature: public key not found
これでkey.encの復号は完了。あとは、key.encを復号した結果の鍵を利用してflag.html.encを復号すれば良さそう。
しかし、flag.html.encが何のアルゴリズムで暗号化されているかどうかわからずに競技が終了してしまった。
どうやら鍵長とbinwalkの結果でアルゴリズムを特定することができたらしい。以下、binwalkの実行結果。
$ binwalk flag.html.enc

DECIMAL       HEXADECIMAL     DESCRIPTION
--------------------------------------------------------------------------------
0             0x0             OpenSSL encryption, salted, salt: 0xF61A179-5D7CAE48
最初はファイルサイズからRSAあたりのアルゴリズムかと思っていたが、パスフレーズとソルトを鍵としたAESによって暗号化されているようだ。 ここまでできたら以下のコマンドを実行し、flag.html.encを復号する。
openssl aes-256-cbc -kfile decrypted_key -d -in flag.html.enc -out flag
最後に中身を確認して終了。
<!DOCTYPE html>
<html>
<head>
  <title>MITRE CTF 2019 Homepage.</title>
</head>
<body>
<h1>This is an HTML Page</h1>
<br>
<p>Test Flag please ignore:</p>
<p>MCA{0p3n55l_c0mm4nd_l1ne_ch4ll3ng3_fl4g}</p>
<p style="display:none;">MCA{66b2f50cd2d6b9622c6be902ee2b0976badb4684}</p>
</body>
</html>
おわりに
最近のcrypto難しくないですか...
参考
https://wiki.openssl.org/index.php/Enc
https://github.com/swag-wafu/mitre-2019/blob/master/PGP.md
https://jemsec.blog.so-net.ne.jp/2013-02-10
https://gist.github.com/reggi/4459803#file-openssl-list-cipher-commands
【 FIDO Conformance Toolsメモ 】イントロダクション
はじめに
FIDO Conformance Toolsのテストのクリアを目指してやっていきます。これはその奮闘記です。
そもそもWebAuthnのRelying Party実装ってどうやるの?という方は以前、資料を作ったので目を通していただけると幸いです。
www.slideshare.net
こちら以外にも実装に役立ちそうなリンクを参考に貼っておきますので合わせて見ていただければと思います。
FIDO Conformance Toolsの取得
そもそもFIDO Conformance Toolsはどうやって取得できるのか説明します。
テストツールは誰でも取得できる訳ではなく、以下のページからテストツールへのアクセスを要求して承認される必要があります。
テストツールへのアクセス要求画面は以下のようになっています。承認されると数日後にテストツールのURLやらID、パスワードなどがメールで届きます。

承認される条件はよくわかりませんが、自分はCompany NameとFIDO Memberが空欄のままで大丈夫でした。
テスト項目
そもそもどういったテストが行われるのかですが、以下に記載されている仕様を満たしていくイメージになります。
https://fidoalliance.org/specs/fido-v2.0-rd-20180702/fido-server-v2.0-rd-20180702.html
自分が利用しているバージョンv0.10.110(BETA)(BETA FIDO2)では合計158のテストが存在します。
テストの大項目としては以下のようになっています。
PublicKeyCredentialsCreation
- Server-ServerAuthenticatorAttestationResponse-Resp-1 Test server processing ServerAuthenticatorAttestationResponse structure
- Server-ServerAuthenticatorAttestationResponse-Resp-2 Test server processing CollectClientData
- Server-ServerAuthenticatorAttestationResponse-Resp-3 Test server processing AttestationObject
- Server-ServerAuthenticatorAttestationResponse-Resp-4 Test server support of the authentication algorithms
- Server-ServerAuthenticatorAttestationResponse-Resp-5 Test server processing "packed" FULL attestation
- Server-ServerAuthenticatorAttestationResponse-Resp-6 Test server processing "packed" SELF(SURROGATE) attestation
- Server-ServerAuthenticatorAttestationResponse-Resp-7 Test server processing "none" attestation
- Server-ServerAuthenticatorAttestationResponse-Resp-8 Test server processing "fido-u2f" attestation
- Server-ServerAuthenticatorAttestationResponse-Resp-9 Test server processing "tpm" attestation
- Server-ServerAuthenticatorAttestationResponse-Resp-A Test server processing "android-key" attestation
- Server-ServerAuthenticatorAttestationResponse-Resp-B Test server processing "android-safetynet" attestation
- Server-ServerPublicKeyCredentialCreationOptions-Req-1 Test server generating ServerPublicKeyCredentialCreationOptionsRequest
GetAssertion
- Server-ServerAuthenticatorAssertionResponse-Resp-1 Test server processing ServerAuthenticatorAssertionResponse structure
- Server-ServerAuthenticatorAssertionResponse-Resp-2 Test server processing CollectClientData
- Server-ServerAuthenticatorAssertionResponse-Resp-3 Test server processing authenticatorData
- Server-ServerPublicKeyCredentialGetOptionsResponse-Req-1 Test server generating ServerPublicKeyCredentialGetOptionsResponse
MDS
- Server-ServerAuthenticatorAttestationResponse-Resp-1 Test server processing ServerAuthenticatorAttestationResponse structure
FIDO Conformance Toolについて
利用イメージ
今回利用しているテストツールのバージョンはv0.10.110(BETA)(BETA FIDO2)になります。
現状、macOSで動作するものではこちらのバージョンが最新のようです。
テストツールを起動すると以下のような表示がでてきます。自分はFIDO2 Testsをやっていきますが、FIDO2 以外も試せそうです。

FIDO2 Testsを選択すると以下のような画面が表示されます。
Server Testsにチェックを入れ、Server URL(http://localhost:3000など)を入力することで検証が行われます。

動作イメージ
まず、FIDO Conformance Toolsの動作イメージについて。
FIDO Conformance ToolsはElectron製であり、以下のようなに動作していそうです。

サーバーのURLを入力すると特定のパスに対してリクエストを送信し、そのレスポンスをチェックしているようです。
あくまで各パスに対してリクエストを送信し、レスポンスを検証しているだけなので、フロントエンドとバックエンドが分離しているような構成のRPの方がテストしやすいかもしれません。(サーバーサイドレンダリングしているバターンだとテストし辛そう??)
確認推奨事項
まず、テストする前に最低限以下を確認しておいた方が良さそうです。
- FIDO Conformance Toolsがリクエストを送信するエンドポイントが用意されているか
- FIDO Conformance Toolsが送信するパラメーターを受け取れる状態か
- FIDO Conformance Toolsが検証できるようなレスポンスの形式か
上記についてそれぞれ説明していきます。
FIDO Conformance Toolsがリクエストを送信するエンドポイントが用意されているか
具体的に必要なエンドポイントは以下の4つになります。
- /attestation/options
- /attestation/result
- /assertion/options
- /assertion/result
それぞれのパスで行う処理に関しては以下に詳細に記載されているのでここでは割愛します。 techblog.yahoo.co.jp
FIDO Conformance Toolsが送信するパラメーターを受け取れる状態か
以下、実際にConformance Toolsから送信されていたパラメーターの一つになります。

displayName、username、attestationというkeyに対してvalueが入っているのが確認できます。
つまり、RP側で上記の名前でパラメーターを受け取るように実装していないと、ユーザー名が見つけられない等の思いがけないエラーとなります。
それぞれのパスに対して送信される具体的なリクエストはこちらを参考にすれば問題ないでしょう。
https://fidoalliance.org/specs/fido-v2.0-rd-20180702/fido-server-v2.0-rd-20180702.html#examples
FIDO Conformance Toolsが検証できるようなレスポンスの形式か
RPではConformance Toolsが送信したリクエストに対して、期待しているレスポンスを返さなければなりません。
そのためには、レスポンスがConformance Tools受け取れ検証できる形式でなければならないという前提があります。
具体的にどういったレスポンスを返せばよいのかも以下を参考にしてください。
https://fidoalliance.org/specs/fido-v2.0-rd-20180702/fido-server-v2.0-rd-20180702.html#examples
おわりに
何かしらの認証器で登録および認証ができ、今回紹介した内容をクリアすると大体スタートラインに立てたイメージです。 (↓自分のスタート時)
軽くリファクタリングして再度 FIDO Conformance Tools実行してみた。
— (56) (@kg0r0) 2019年2月16日
先は長そうだ...😇 pic.twitter.com/6lYXiY3lbD
ここまでできたら、対応するAttestationを増やしたり、バリデーションの処理を増やしたりしてテストを地道にパスして行く作業に入ります。 自分もこの記事を書いている段階で passes : 129、falilures : 29 なのでまだまだ先は長いですが頑張っていきましょう。

引き続き、キリが良いタイミング(特定の項目を全部パスしたなど)で更新していこうと思います。
参考
https://techblog.yahoo.co.jp/advent-calendar-2018/webauthn/ https://fidoalliance.org/specs/fido-v2.0-rd-20180702/fido-server-v2.0-rd-20180702.html https://fidoalliance.org/certification/functional-certification/conformance/ https://github.com/fido-alliance/webauthn-demo https://medium.com/@herrjemand/introduction-to-webauthn-api-5fd1fb46c285 https://speakerdeck.com/ynojima/webauthn-from-the-relying-party-view
InterKosenCTF writeup
はじめに
cryptoは全部解くぞ!!という気持ちで始めたがOh my Hashで撃沈した。ついでに裏で開催されていたInsomni'hack Teaser 2019 CTF も撃沈した。

[Forensics 50pts]attack log
以下問題文。
Someone seems to have tried breaking through our authentication. Find out if he or she made it to the end.
問題ファイルとしてpcapngファイルが降ってくる。中身を見るとHTTPの401 Unauthorizedのパケットが大量にある。ここで200 OKを返した通信もあるのではないかと思い,http.response.code == 200でフィルターする。それらしい通信が一個だけあったので中身を見てみる。
 Basic認証のパスワードがFLAGらしいのでデコードする。
KONSEN{bRut3F0rc3W0rk3D}
[Crypto 100pts]strengthened
以下問題文。
If you choose a tiny e as an RSA public exponent key, it may have the Low Public Exponent Attack vulnerability. So, I strengthened it.
問題のファイルは以下の2つ。
from Crypto.PublicKey import RSA
from flag import flag

assert(flag.startswith("KOSENCTF"))

m = int(flag.encode("hex"), 16)
key = RSA.generate(2048, e=3)

while pow(m, key.e) < key.n:
    m = m << 1

c = pow(m, key.e, key.n)
print("c={}".format(c))
print("e={}".format(key.e))
print("n={}".format(key.n))
c=4463460595992453701248363487821541441150903755360725278018226219397401710363861496059259094224390706180220952190225631877998805079875092397697611750633506584765344462795005248071815365597632474605092833538433542560077911683343354987797542811482161587946052311886487498036017642286567004537026772476444248546454191809039364154237333857544244714476659565633430727987398093807535598721617188645525580904749313860179445486488885745360135318781538863153023533787846418930231495508425497894530548826950697134882405386297339090051713047204435071147720540765043175338026604739425761557904004394283569956586190646684678673053
e=3
n=20169655945950105431738748243853927780331001640334986437959982160666610494142435056640595584712525268749025697813786742196769781107156600305882353438821338449740459508913799371467499117044809895128843358770212122149984787048869330121794532368786611513049229117856338074267497697268551262926233194699624069306801634627577488539763083043246322479538731125975155062918653790730355348606063864283452838775795802376825160728197871502803176167192178252802683495999009932194712635685410904731513241097681486329083486997949127983471617545787155883408710148611375930619822455594408723266661117411592239721104309931413551856711
RSAにおいて,が極端に小さく,
となる場合,RSAの暗号化
の結果として
が出力されてしまう(the Low Public Exponent Attack)。
そこで,この問題ではが
より大きくなるまで以下のコードで
を左シフトしている。
while pow(m, key.e) < key.n:
    m = m << 1
ここで,与えられた暗号文が生成された際に利用された初回のが
より小さく,上記のループに入ったと仮定する。上記のループは
となった時点で抜けるので,
と
がそれなりに近い値になっていると考えられる。よって,
の商を総当たりで求め
から
がわかりそう。以下solverです。
import gmpy2
c = 4463460595992453701248363487821541441150903755360725278018226219397401710363861496059259094224390706180220952190225631877998805079875092397697611750633506584765344462795005248071815365597632474605092833538433542560077911683343354987797542811482161587946052311886487498036017642286567004537026772476444248546454191809039364154237333857544244714476659565633430727987398093807535598721617188645525580904749313860179445486488885745360135318781538863153023533787846418930231495508425497894530548826950697134882405386297339090051713047204435071147720540765043175338026604739425761557904004394283569956586190646684678673053
n = 20169655945950105431738748243853927780331001640334986437959982160666610494142435056640595584712525268749025697813786742196769781107156600305882353438821338449740459508913799371467499117044809895128843358770212122149984787048869330121794532368786611513049229117856338074267497697268551262926233194699624069306801634627577488539763083043246322479538731125975155062918653790730355348606063864283452838775795802376825160728197871502803176167192178252802683495999009932194712635685410904731513241097681486329083486997949127983471617545787155883408710148611375930619822455594408723266661117411592239721104309931413551856711
e = 3
me = c + n
m,result = gmpy2.iroot(me,e)
i = 1
while (result != True):
    i += 1
    me = c + (n * i)
    m,result = gmpy2.iroot(me,e)
    print("count: ", i)
    print("c + (n * {}) = {}".format(i, me))
print("m: ", m)
以下は実行結果の一部です。 だったようです。
count:  5
c + (n * 5) = 105311740325742980859942104707091180342805911957035657467818137022730454181076036779262237017787017049925349441259159342861847710615658093927109378944740198833467642007364002105409310950821681950249309627389494153310001846927690005596770204655415219153192197901168177869373506128629323319168192745974564595080462364946926806853052749073775857112170315195509206042580667047459312341751936510062789774783728325744305249127478243259376016154742430127166441013782896079903794673935480021552096754315358128780299840376042979007409800776140214488191271283821922828437138882711469377891209591452244768562107740303752437956608
m:  47223582418329825209745914667971590820722714318452791326821588181662319399773846734427941516181423981487302118538346612769422888886822520261688728358369123097589459238242699552111899674856615315187592855552
FLAGはKOSENCTF{THIS_ATTACK_DOESNT_WORK_WELL_PRACTICALLY}
おわりに
楽しかったです。
